Some of my favorite things to do are finding new things to do with Autumn Harvest Bounty. Fermented vegetables preserved for winter add nutrition to everyday meals, and peppery Nasturtium blossoms look great on any plate. So much food to play with!
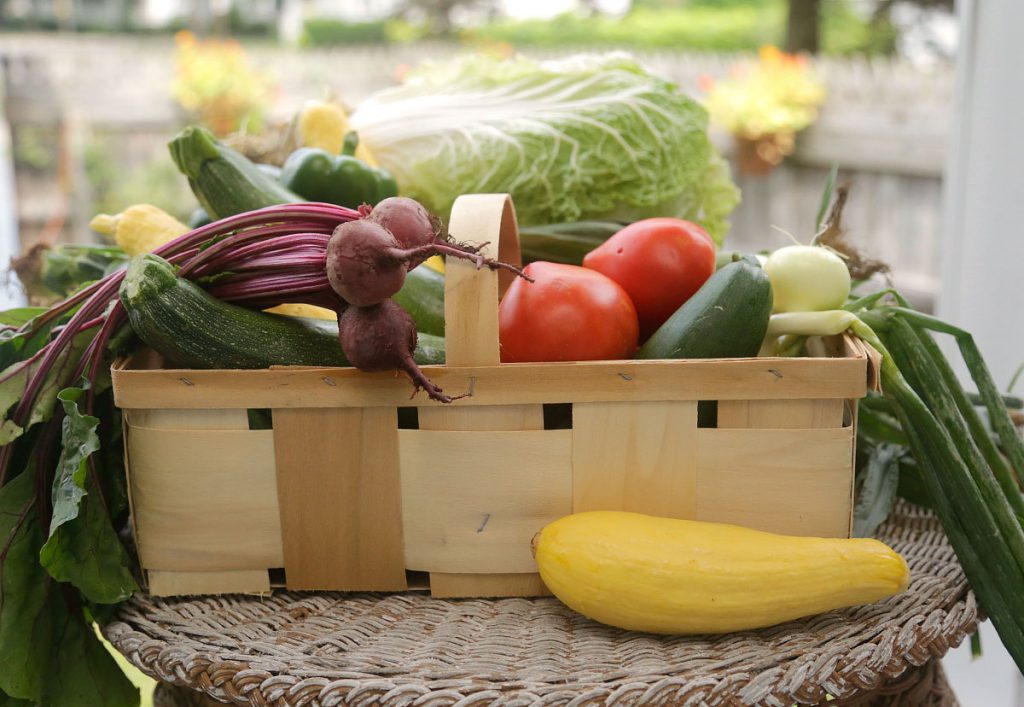
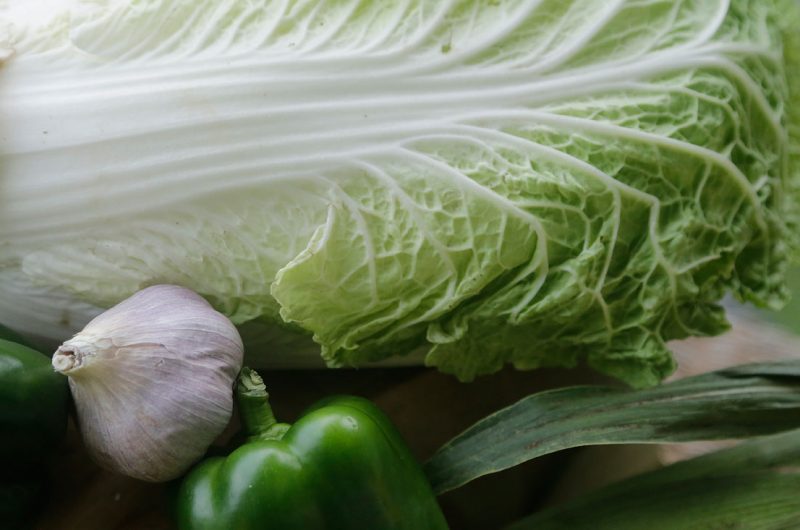
I love going to the Farmers Market and getting fresh veggies; they look so luscious I have to make them pose for a photo shoot. Too beautiful not to record for posterity. So healthy too. I also like thinking that my meals are wholesome, providing those who eat my food with great nutrients and good taste. So come with me and share a little of what I experimented with on just one such foray into the market.
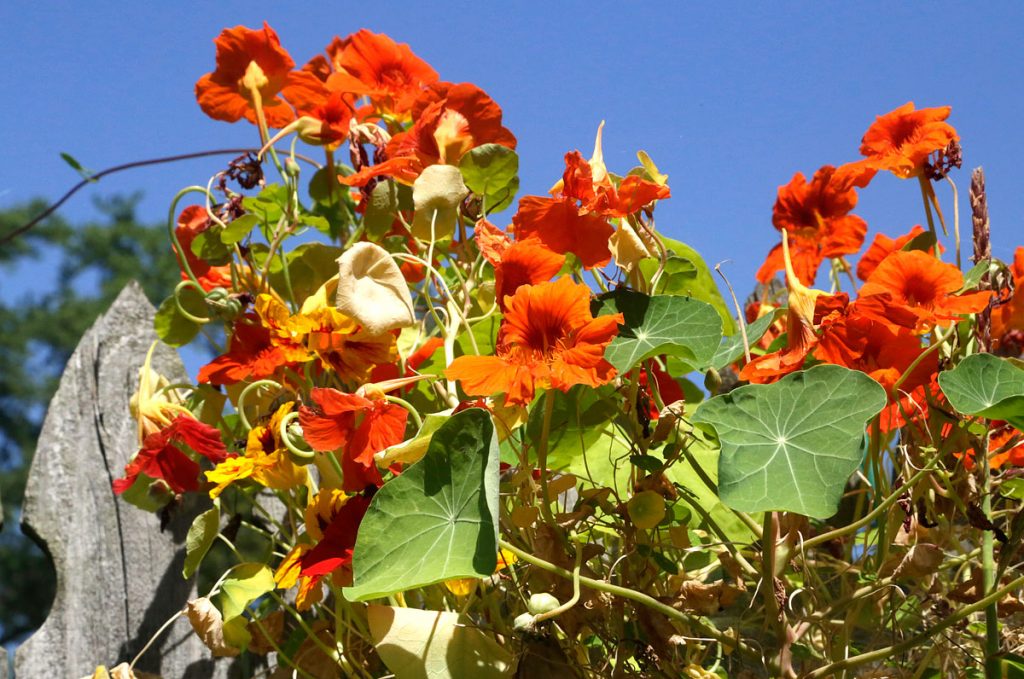
Nasturtiums are great in your garden or in a pot.
First of all, let me say that one of my experiments led to growing nasturtiums in my garden every year. So nasturtiums were in full bloom as I made a fermented vegetable pot with the above amazing basket of fresh vegetables.
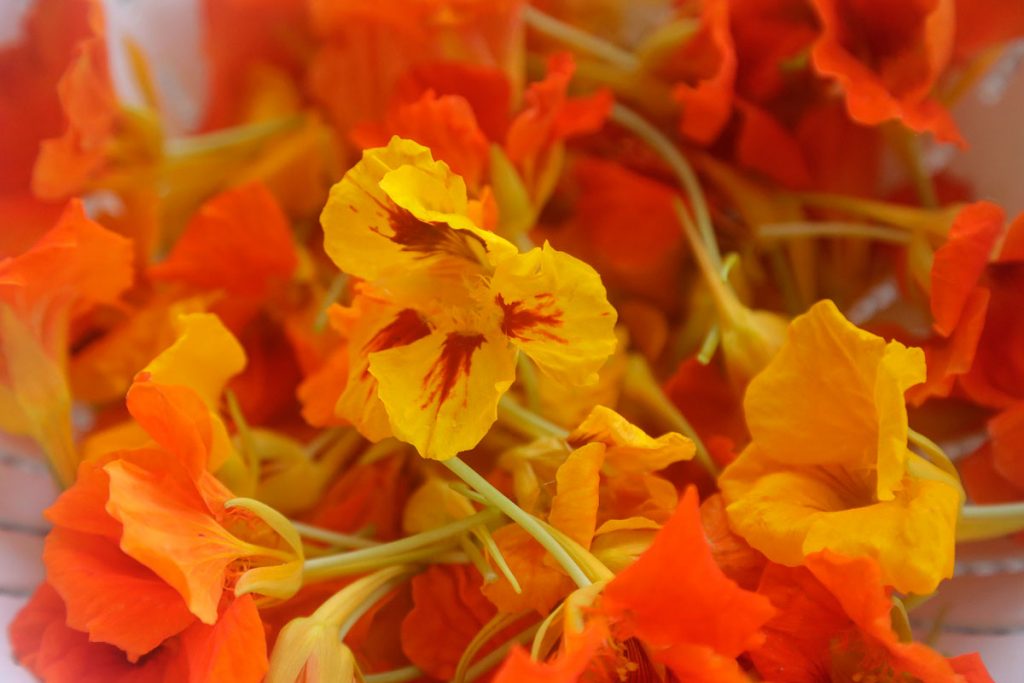
Nasturtium flowers contain 20 mg of Lutein.
I started growing Nasturtiums for several reasons. I remember visiting my aunt as a child, and she grew them for her salads. So it was out of nostalgia that I started a few seeds in pots.
I also found out that the blossoms of Nasturtiums contain Lutein which is one of two major carotenoids’, or pigments, found to help our eyesight. Lutein is said to act as a filter protecting our eyes from the harmful effects of the sun. Nasturtiums grow from seed and bloom pretty much steadily all summer and fall. They have a mildly peppery taste. You can also eat the green leaves; they are sometimes more peppery. Even if you can’t entice some of your family to try them, they also make great decorations a-la-plate!
This year I also planted some Nasturtiums in a rock garden that routinely dries out mid-summer and starts to grow mostly weeds. To my surprise, they thrived all summer long and kept weeds from growing in those areas where they were planted. Nasturtiums also ward off harmful insects. They lasted long into the fall before the first frosts. So guess where I am planting more Nasturtiums next spring?
Some people say they have more Nasturtium leaves than flowers. I have not experienced this, but after a little research, find out that Nasturtiums actually prefer poor soil! Too rich, and they have too many leaves. Go figure!
You might also be interested to know that Cooked Spinach is also one of the best natural food sources of lutein and zeaxanthin, both of which are good for the eyes.
With such a bumper crop this year, I also experimented with drying them and have a small jar that I am saving for some Cream Cheese and Nasturtium Sandwiches sometime in the middle of winter. One year I also put them in Apple Jelly with Jalapeno Peppers, a really spiced-up sweet treat with cheese. The nasturtiums, of course, just go limp when you dry them or put them in jelly, so eating them when they are fresh is best!
Thinking of Nasturtiums in Winter
In this wintry cold,
Trina Astor-Stewart
I’m summer yearning…
Remembering
Nasturtiums along my backyard fence.
Bright yellows, reds…
A bit of peppery delight-
Plucked fresh, making salads bright.
Oh, to relish that little extra culinary sense.
Decorations for a Salad Plate

Fermenting Vegetables
If you are unfamiliar with fermented vegetables, you may have heard of Korean kimchee. Not to mention the flavor enhancement these foods add to a meal. Probiotics we buy these days are actually a product of fermentation. The process of fermentation produces thermophilic lactic acid, a form of natural lactobacillus, flora, and fauna. Lactobacillus is a microorganism bacteria from the Lactobacillaceae family, which are non-spore-forming, rod-shaped bacteria that produce lactic acid as the major end product of fermentation. A normal part of a healthy gut.
Many people have developed a craving for the taste of kimchee. More than being delicious, it is amazingly good for you too. Another well-known fermented food is Sauerkraut. Both Kimchee and Sauerkraut were originally developed as a way to preserve foods. There are many fermentation recipes.
People all over the world have been fermenting food for centuries. As far back as anyone can gather, people have been fermenting fruits and vegetables to make alcoholic beverages from fruit, honey, wheat, barley, and rice. The whole idea of fermentation was to try to preserve foods from going bad. The spontaneous fermentation of milk from camels, goats, sheep, and cattle led to the actual practice of helping the fermentation process develop as far back as 10,000 BCE.
Sourdough Bread is a fermented food that gives the bread a different flavor. San Francisco Sourdough is a special strain found nowhere else. Traditional sourdough yeasts are formed by the surrounding air.
With a vivid imagination, you can almost see how one day in the distant past, some milk was put away to drink at a later time, and low and behold; it fermented naturally because of the microflora present in the milk. Tasting it at just the right time, our forebear realized, “Hummmm…. this is good.” Any longer, and it would have been spoiled. There is nothing like the putrid smell of rotten milk, vegetables, or fruit. Getting the fermentation process just right means it becomes amazing.
Much later, in 1856, a French chemist called Louis Pasteur experimented with yeast fermentation as a science and discovered that the fermentation practice in the kitchens of the world was actually more valuable than just for the preserving of food. His studies led to more scientists discovering the beneficial properties of fermented foods on health.
Elie Metchnikoff, a Russian bacteriologist in the early 1900s, found that Bulgarians had a much longer lifespan than most other cultures. He attributed this to their practice of fermentation which had over many years developed a unique strain called Lactobacillus Bulgaricus. Since then, a great deal has been discovered, and today, those of us who are kitchen experimenters work our own little “Lacto” miracles for the benefit of our families.
The Germans, Austrians, and the Dutch are well known for Sauerkraut, which in its natural form is fermented cabbage. Once cooked or bottled, it loses most of its beneficial lactobacillus but is nonetheless still very nutritious and good for you, as well as adding great taste to many things. Some people would not eat a hot dog or other sausages on a bun without sauerkraut.
You may also have heard of Chow-Chow, an old traditional recipe. I can remember my grandmother in North Carolina making Chow-Chow and bottling it for winter. It is a sort of pickled relish. You can even buy Chow-Chow in stores now. Grandmother would be amazed!
In India, they have also been fermenting many foods for centuries, and many of the intricacies of fermented foods are done on a larger scale.
Please note: Fermenting some foods is not difficult. I have never had a bad batch, but I limit the foods I ferment to the easier ones to work with. If in doubt, throw it out! You can pretty much smell if it is good or not. Just be aware.

You can ferment almost any combination of vegetables. It is best to start with a traditional recipe. I have been fermenting for a few years now, so I experiment with a number of vegetables depending on what is freshest from the farmer’s market at the time.
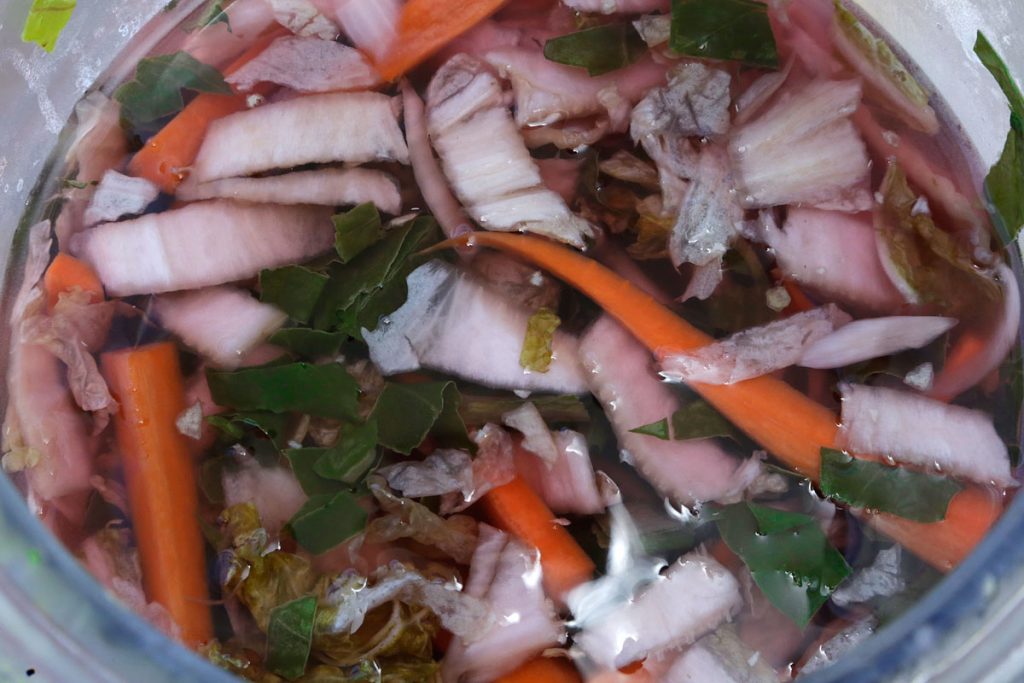

Fermented Vegetables retain their crunch!
In the photographs above, you can see the fermented vegetables. I will describe the whole process below. I don’t have photographs along the way. I just got too busy. As you can see, the jar is half empty. The frosting on the jar is due to temperature. I lifted it out of the fridge during dinner making and figured I had better take a couple of pictures before it was all gone! My back porch is just off the kitchen, so convenient for times like this. Since I decided to start blogging, almost everything is something that might be of interest to someone. 🙂
Fermenting Vegetables in a Salt Base…
Before I give you the exact basic recipe you can use to ferment your favorite vegetables, let me discuss the type of salt with you.
Traditionally Pickling Salt, Kosher Salt, or Sea Salt can be used to ferment vegetables. You can’t use Table Salt as it contains Iodine. At our house, we are careful with regular salt. Pink Himalayan Sea Salt, with many trace Minerals and Elements, is better for you and does not taste as salty. I am still careful not to add too much. When I use some Fermented vegetable mixture in a salad or other stir fry, I use this as the salt rather than adding any in addition. We know we are getting some trace minerals in addition to taste. We augment natural kelp containing iodine to replace what would ordinarily be in table salt. Or we take a drop or two of iodine in a glass of water now and then.
- Pink Himalayan Sea Salt is available in both coarse and finely ground varieties. If you don’t eat table salt with Iodine, remember to augment your diet with Iodine.
- If you only have the coarse variety, you can grind it using a mortar and pestle. For some reason, this salt reacts to the metal lids on salt shakers. So find ones that are entirely plastic or use a small mason jam jar.
- Another way to use it is to make Sole Water. Add about 1/3 cup of coarse Pink Himalayan Salt to a Pint size (16oz) Mason Jar and fill it with cold filtered water. Shake and let stand until the water above the remaining salt is clear. About 24 hours. There are lots of small glass bottles with plastic lids that contain some sort of condiment or juice. I saved a bottle of cherry juice concentrate that works nicely. I use a small amount, such as a half teaspoon or so, when making a salad or also for use in cooking. Adding only “to taste.”
Pot of Fermented Vegetables
Course: CondimentCuisine: AmericanDifficulty: Medium50
servings30
minutesFermented Vegetables – Basic Recipe
Ingredients
3 beets, peeled and thinly sliced
1 shredded cabbage – in this recipe, I used Nappa Cabbage
2 onions, peeled, halved, and thinly sliced
1 garlic clove, grated
1 thumb of ginger, peeled and grated, about a 2-inch piece
1 green pepper, seeded and sliced.
5 or 6 beet top leaves, well washed
3 Carrots, cut into fine sticks or Julienned.
Directions
- Prepare the Brine:
- Rule of Thumb for Brine Mixture: 1 to 3 tablespoons per quart of water. Use pure sea salt or pickling salt. I use Himalayan Pink Sea Salt. A 1-quart jar equals 4 cups.
- Boil water, and in a separate glass jar, add the desired amount of salt to dissolve it. I have had good success using 2 tablespoons of salt per quart. Let the brine stand to cool, not warmer than hand temperature or 68 F.
- Tips and Preparation:
- Prepare 1 large glass jar with a lid that will serve as your fermentation jar. Sterilize each time before use by pouring boiling water into the jar and then draining it. You can also use more than one glass jar, depending on the amount. Remember that during the fermentation process, the mass will bubble and “work.” As a result, it will expand. If your lid is too tight or the jar too small, some of the liquid will seep out. Always place the jars on a plate for this reason. Discard any brine that overflows.
- The brine must cover the vegetables. Never stir using metal utensils. I use plastic chopsticks, a plastic spoon, or a plastic bowl scraper. Metal is only harmful when it sits in the ferment for a longer time; I still prefer using non-metal utensils.
- Prepare and Mix the Vegetables Together:
- Mix all of the fresh raw veggies you have thinly sliced in a large glass or plastic bowl. You can use your clean hands for this and also involve the children. It is fun. In the olden days, it was said that the flavor of your own hands gave a distinctive taste to the Kimchee or other fermented vegetable mixture. Thus when neighbors made the very same recipe, it would always taste unique. Make things like this with a happy heart. Your feelings go into the foods you make, hence the saying, Cooked with Love.
- Pack your glass jar full of the vegetable mixture, leaving some room at the top. Pack only about 3/4 full.
- Pour the cooled brine liquid over the vegetables, ensuring they are completely covered. Close the lid. Use some plastic wrap around the outside if necessary.
- Place the jar on a plate to catch any overflow.
- Place at room temperature. The amount of time for fermentation will change depending on your climate and the time of year.
- This is my favorite part… Every morning, look at the jar and ensure the vegetables are covered. They will rise to the top, and so I take my plastic utensil and push the mixture down a little. Sometimes I give the mixture a gentle stir and taste a little as well.
- It takes between three to six days to reach the desired ferment. You decide when it is sour enough. It is fun to watch the lovely bubbling action.
- If there is any discoloration, off-taste, or putrefaction, throw the whole thing out. This has never happened to me; just saying. You will be fine if everything is clean and the vegetables are fresh with no decayed parts.
- When the desired sourness is achieved, place the jar, covered, in the refrigerator and use small amounts as a healthy and tasty condiment for meals. As additions to salads and even add to stir-fried dishes instead of salt for a great taste.
- This will keep in your refrigerator for 3 to 4 months. That is, if you can keep from eating it that long. The taste grows on everyone, and pretty soon, you will want more of it.
Notes
- Fermented vegetables add flavor to cooking and salads.
- The microbes in the fresh vegetables themselves react with the salt to ferment the vegetables.
- Chlorinated water can hinder the fermentation process. You can remedy this by letting the water sit out overnight. I prefer boiling it first and then letting it sit uncovered so the chlorine can off-gas.
Adding Fermented Vegetables to Fresh Salads
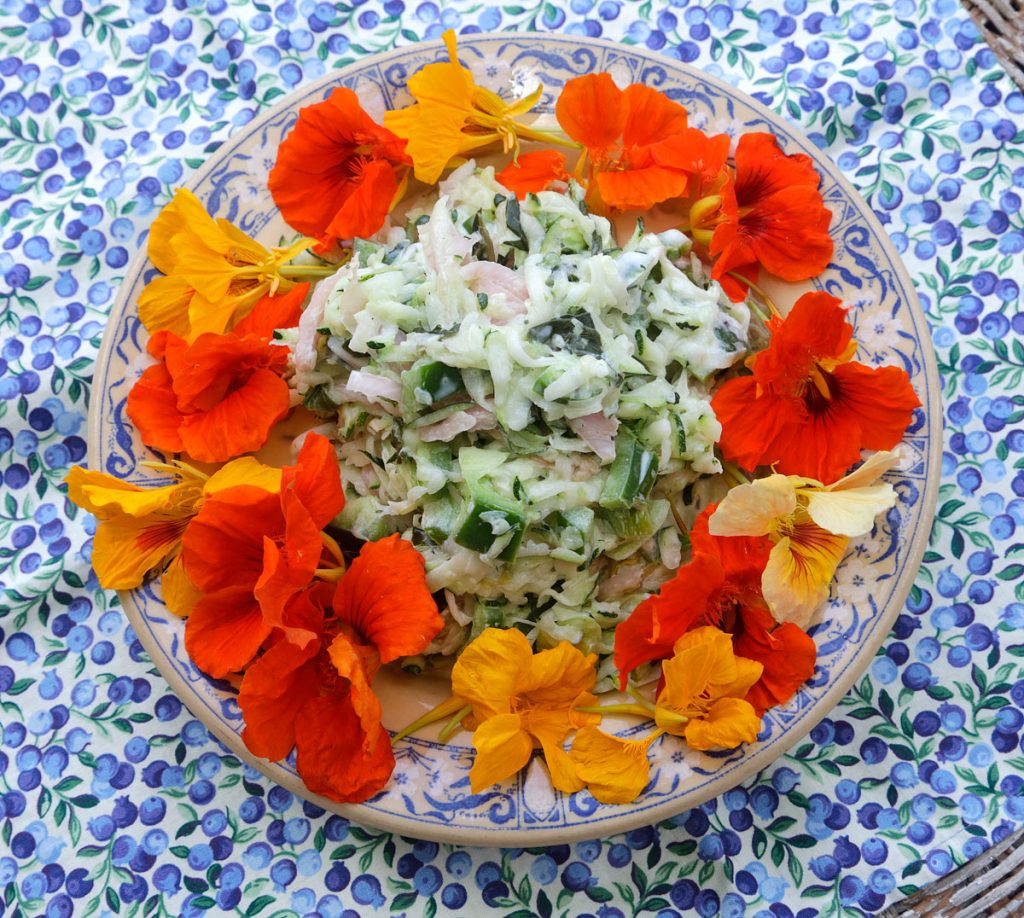
Zucchini Salad with Fermented Vegetables and Nasturtiums
- 1 medium-sized Zucchini grated.
Place Zucchini in a mixing bowl with
1 finely chopped green pepper.
1/4 cup of Fermented Vegetables
2 tablespoons Mayonnaise or plain yogurt, or sour cream
Blend and circle with Nasturtium Flowers.
Cucumber Salad with Chives, Mayonnaise, and Yoghurt Dressing.
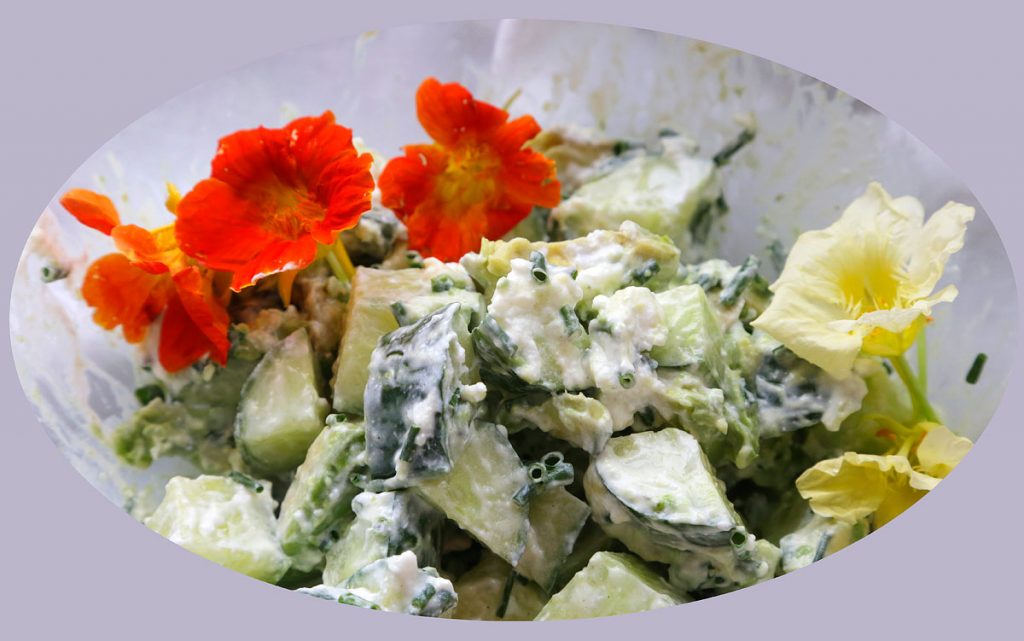
Easy cucumber salad
- Cucumbers are available all year round and make a quick and easy salad to go with any meal. I added chives and nasturtiums to the above salad since they were readily available when I mixed this up. In winter, you can add garlic, green onions, or even some tomato, whatever you have on hand. I like English cucumbers since the seeds are smaller, and you can use the peel; washed well.
- Basic Salad Dressing for One English Cucumber
Dash Ground Black Pepper
4 Tablespoons Unflavored, Plain Greek Yoghurt
3 Tablespoons Mayonnaise
Chopped Chives
2 tablespoons fermented vegetables.
Eat your veggies today… enjoy life!
Because regular table salt contains Iodine, it is important to supplement your diet with an additional form of Iodine. Some Kelp contains Iodine. It only takes a drop in a glass of water every now and then to replace the iodine you might normally get from salt. A small bottle will last you a long time.
Give a Gift of Nasturtiums… Looking for a great flower to give the gardeners in your life? Brighten someone’s day with a greeting card and include a little envelope of Nasturtium Seeds. Place some from a bulk package in your own little envelopes, and include a note. The easiest and most long-lasting flowers you will ever grow. Get someone started growing Nasturtiums today…
Additional Links to interesting articles you may enjoy.
Have a look at, Gluten-Free, You Can Do It – My latest cookbook is now a Hardcover Edition, as well as a Kindle e-Book version.
For Gluten-Free Recipes, visit our sister site. Gluten-Free Trina
The Farmers Market in Niagara Falls, New York, is an awesome place to visit.
Also, while in Niagara Falls, visit the Marketside Restaurant for breakfast!


